
Exams over, I'm finally back in the sack!
ACDC - Back in Black by filipivan
Watch this space for upcoming developments, including one that a few people have asked for. Let's just say that I've finally found a way I can record fights in a decent quality without my FPS going <10.
Friday, 17 June 2011

Wednesday, 27 April 2011
On Hiatus
RL is flaring up - I have exams starting within a month and thus will be cutting back on Eve in order to focus on studying. This will also extend to this blog - don't expect to see any new posts for the next couple of months.
In the meantime, last night I helped down an Archon and a Nidhoggur whilst setting up our HQ for our next campaign - Molden Heath, Resurgence.
The original FC of the fleet who lured it out (accidentally) has written up a fairly accurate report here, which I have pasted below (with minor edits in order to make more sense):
The Battle Report is found here and is correct as far as I am aware.
The only incorrect parts of the above report is regarding me - I wasn't contacted by anyone to help them kill the Archon, I was actually stalking them and planning on killing them when I found them engaging the Archon & its support on the gate. Funny how things work eh?
See you in two months.
In the meantime, last night I helped down an Archon and a Nidhoggur whilst setting up our HQ for our next campaign - Molden Heath, Resurgence.
The original FC of the fleet who lured it out (accidentally) has written up a fairly accurate report here, which I have pasted below (with minor edits in order to make more sense):
We still had a respectable fleet up and Lee wanted to take his new falcon for a spin. I didn't check his fit beforehand (more on this later) and we heard tell of a camp near muttokon. We headed out with 3 canes, 2 drakes, 2 rifters and a falcon and sure enough, there were a brutix, mael and myrm on gate. The fleet held while I went to spike it but unfortunately the mael and brutix warped off before I landed so I was forced to take potshots at the myrm, baitdrake style. His friend jumped through in a drake and opened up on me so I pointed him and the game was on.
We jumped in and warped to me with the falcon staying hidden to try and lure them into escalating with their entire fleet before revealing the futility of it. Sure enough, they landed their fleet back on us and it was game on. However they had a surprise in store, the moment the battle got underway an archon landed. Things started badly with a gank fit brutix getting in cael's face while we couldn't get a jam (no gal jammers) but fortunately it's massive lack of tank meant that it got popped between repair cycles and Cael got free. While he was recovering his shields I set him with the task of finding me a fleet to deal with my archon so I could focus on FCing.
Back on the field they had a Harbinger, Myrmidon, Drake, Maelstrom, Harbinger and Raven escorting their Archon but were struggling to really apply their dps. The Harbinger got out of rep range and a Rifter kept it there while we smashed it down. The first of Cael's volunteers landed on grid and I was pleased to see it was Suleiman Shouaa, a local cane pilot with a LOT of skill points, experience and dps. He wasn't on comms with us and the extent of our communication was him saying "that mael is arty fit, warn the rifters, I'm gonna kill it" before soloing it in about 30 seconds flat. They weren't getting anywhere as they were tied to the Archon's rep range and we were nanoing so they did what anyone would and warped in a second Carrier, this one a Nidhoggur.
We split our points between the carriers and the Xs in our intel channels started rolling in. Vanderie, a member of Gunpoint Diplomacy took over and we were quickly able to finish off the support in the form of a Myrmidon, Raven, Blackbird and Drake. Unfortunately the carriers decided they were committed and their support kept returning and our Falcon was sitting exactly 100k off an aligned point. A stabber fleet landed on him at 0 and 2 shotted his completely untanked hull, sending our shiny new falcon to its grave. Seconds later Sulei hulksmashed the SFI but still, .
The entire op was getting pretty messy by this point and the Teamspeak Server decided to crash on us which probably contributed to the death of a weird active tanked pest which was sitting within neut range of the carriers. It wasn't ours though but still, things weren't going perfectly. Gunpoint had cynoed in a carrier of their own (which got promptly jammed) but they didn't have enough Liquid Ozone to bring in some dreads and the Carriers weren't going down. They could have probably still logged out at this point despite us having 20 guys on the field. They continued to try and bring in support but there was just too much and all that they achieved was letting me headshot a Falcon.
We were very slowly breaking the Archon's tank while we hit the Nidhoggur with jams and neuts but it was painstaking work. People were bringing in alts, fuel, spare ammo and boosters to try and keep the damage up and eventually a cyno was lit up for two executioners dreadnoughts. Both carriers instantly started self destructing but we were able to kill the archon about 15 seconds before it finished its timer, with the Nidhoggur pulling it off successfully.
 |
| Archon goes boom! |
The Battle Report is found here and is correct as far as I am aware.
The only incorrect parts of the above report is regarding me - I wasn't contacted by anyone to help them kill the Archon, I was actually stalking them and planning on killing them when I found them engaging the Archon & its support on the gate. Funny how things work eh?
See you in two months.
Tuesday, 19 April 2011
Eve Online - Spreadsheets Online
After reading fellow Tusker Kishin Hattori's latest blogpost, announcing the opening of his second blog tracking his wallet balance month by month, I decided to do some beancounting myself. Being a lazy fellow, I decided to let the killboard do the majority of the work for me and thus have tracked The Tuskers' kills/losses since January 2010, taken directly from our killboard here. Below are my findings:
Interestingly, the number of kills we get per month has actually decreased, whilst the actual ISK destroyed has increased. What does this mean?
Well, one way of interpreting it is that we're killing less "newbie" ships such as ratting Cruisers, Destroyers and Frigates and instead focusing on our competition which fly more expensive ships such as Battlecruisers, Battleships, Recons etc. Instead of killing the ratters, we are now increasingly able to extract a successful ransom from them - ransoms are not included in these graphs although we do have internal data backing this up.
There is also a noticeable slump in both the number of kills and their corresponding value in ISK round about October and November. Personally, this is due to university starting up again, meaning less time available for pewpew compared to the mostly carefree days in Summer.
Now, let's have a look at losses.
Again, the two lines show a direct correlation as one would expect. Comparing this to the graph of kills above, it is clear that generally, the more kills we get, the more losses we take. This seems rather obvious and becomes crystal clear once you fly in a gang with us - we don't retreat willingly and often engage against the odds, getting a couple of kills against larger gangs and then withdrawing before going back in for another Round.
At the beginning of the data set, the number of ships lost decreases whilst the ISK lost remains fairly constant - this is mainly due to losing more frigates than is normally typical in January 2010, which did not hold true for February 2010.
And now for the final statistic - Efficiency. Often tooted as the statistic by 0.0 players who engage in fleets of 100+ on a regular basis, for small gang pilots it can vary dramatically depending on your luck. Of course, with a corporation as a whole, one would expect it to stabilise around a given figure, for example The Bastards typically hover around 45%-50%, meaning they kill less than they lose. For The Tuskers, here's what it looks like:
As you can see, it appears to fluctuate. However, take note of the scale on the y-axis, ranging from 60% to 90%. If you take the scale as 0% to 100% (all possible values), it does actually appear to settle around, never being lower than 70% and never being higher than 90%, respectable for the amount of traps we spring daily, both knowingly and unknowingly.
So, conclusions?
Numbers are just numbers, your efficiency has no bearing on how much fun you're having. Personally, I've hovered between 90% and 96% efficiency, with no correlation to how much fun I was having on a daily basis, out roaming either solo or with a gang of Tuskers or out of corp friends. Just enjoy the game!
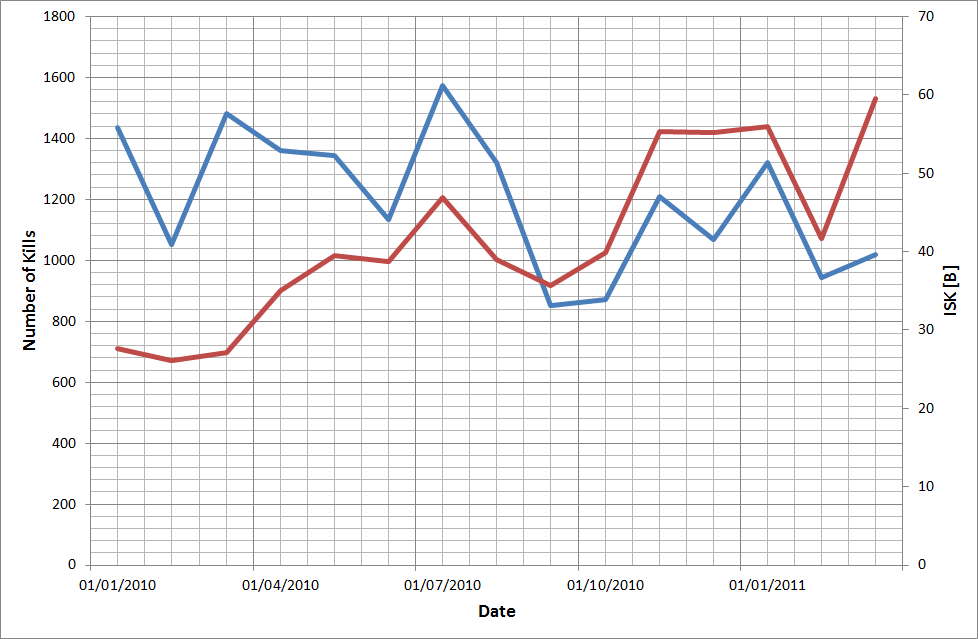 |
| Blue line shows the number of kills, the red line shows the amount of ISK destroyed by these kills |
Well, one way of interpreting it is that we're killing less "newbie" ships such as ratting Cruisers, Destroyers and Frigates and instead focusing on our competition which fly more expensive ships such as Battlecruisers, Battleships, Recons etc. Instead of killing the ratters, we are now increasingly able to extract a successful ransom from them - ransoms are not included in these graphs although we do have internal data backing this up.
There is also a noticeable slump in both the number of kills and their corresponding value in ISK round about October and November. Personally, this is due to university starting up again, meaning less time available for pewpew compared to the mostly carefree days in Summer.
Now, let's have a look at losses.
 |
| The blue line shows the number of losses, whilst the red line shows the amount of ISK lost |
At the beginning of the data set, the number of ships lost decreases whilst the ISK lost remains fairly constant - this is mainly due to losing more frigates than is normally typical in January 2010, which did not hold true for February 2010.
And now for the final statistic - Efficiency. Often tooted as the statistic by 0.0 players who engage in fleets of 100+ on a regular basis, for small gang pilots it can vary dramatically depending on your luck. Of course, with a corporation as a whole, one would expect it to stabilise around a given figure, for example The Bastards typically hover around 45%-50%, meaning they kill less than they lose. For The Tuskers, here's what it looks like:
 |
| Blue line is..efficiency? |
So, conclusions?
Numbers are just numbers, your efficiency has no bearing on how much fun you're having. Personally, I've hovered between 90% and 96% efficiency, with no correlation to how much fun I was having on a daily basis, out roaming either solo or with a gang of Tuskers or out of corp friends. Just enjoy the game!
Monday, 11 April 2011
AAR - Artillery Fleet
Whenever the Tuskers have a roam scheduled, standard practice is to write an After Action Report (AAR) afterwards, detailing what happened. Whilst these are typically long winded (when written by me anyway), my latest AAR is actually fairly short and thus suitable to a blog format. This has been posted elsewhere so apologies if you've already read it before, but it's a pretty good representation of what we in The Tuskers get up to on these roams.
Subscribe to:
Posts (Atom)

 Posts
Posts

